Showing posts with label Diy. Show all posts

Wednesday, January 21, 2015

diy tassel earrings


Hello, here is my version of the tassel earrings.
i thought i would use gold thread to give it a faux gold look.
i made this for the holidays and had a lot of fun wearing them with bright lips.
I hope the pictures explain it all.
How do you feel about tassel earrings?

Monday, August 18, 2014

diy coasters

Supplies needed:
mod podge
craft paper
paint brush

i needed a coaster for work so i thought it would be fun to make some.
i'm sure there are a bunch of tutorials out there like this but here's my version.
i got these wooden coasters from Michaels that came in 4 pk.
first, trace craft paper in the size of the coaster and brush a coat to glue 
the paper onto the wood.
next, continue to brush a few coats of mod podge entire paper.
(wait 5 minutes in between coats)
i cut out an arrow design for one
and a stencil cut out of my initial for another.
i think it's a fun way to get creative
or personalize it for a gift even.

hope you found this helpful! :)

Sunday, February 9, 2014

DIY: polka dot vase

.I found this pier 1 imports vase from the thrif store for $2.99. I painted
 polka dots all over using  gold nail polish.
Quite fun, and if you mess up you can use a q-tip with acetone to remove any
mistakes. Don't worry about it being perfect.
Just have fun!
 I'm quite happy with how it turned out, and it took me approximately
10 minutes. I think it's very Kate Spade-esque.
Let me know what you think and thanks for reading. 

Sunday, November 17, 2013

DIY crystal statement necklace

 Arrange jewels. You need 1 big one for center and 5 smaller ones for each side. 
(Alternate way: You can try sewing or glue the beads onto a piece of felt fabric like I did here). 
 I used wires which took quite a bit longer.
Add jump rings to last bead and connect to desired length of chain.

Hey guys, I hope you all are well!
It's been quite a while. Sorry for the quiteness.
Here's a diy I'm excited to share. I will be honest, it was not easy as I anticpated
but I think well worth the time.
I got all these beads from Michaels for under $20.
My inspiration came from Ily Couture's Crystal Botanica
So gorgeous but I don't have $150 to drop and why should you if you can do it yourself?!
Hmm I'm quite happy with the results. Can't wait to wear this and incorporate it into the holidays.
What do you think?
Let me know if you plan on making it. 

bloglovin ❤ instagram

Sunday, May 5, 2013

DIY hat ribbon


Hey guys, hope you had a well rested weekend.
Here's a new diy i've been working on.
With warmer days ahead, this will be a fun and useful addition to your spring and summer look.
Instead of buying a new hat, you can give it a fresh look just by adding a new ribbon.

I used fabric from an old shirt that was a little faded.
Remember what I said about throwing out old shirts that you
can potentially reuse. Yes it's a form of hoarding but i like to see it as recycling. ;)

Supplies needed:
fabric in your choice of design/color
Velcro with sticky backs
felt 

If you happen to have fabric ribbons laying around in the same width, 
I would recommend using that instead.
If not, this is a good chance to use any old shirts lying around.
The material i used was jersey cotton, a little hard to work with so i added felt
to make it thicker. 
Measure the length and width of the ribbon from your hat and go from there.
I'm pretty sure you can use fabric glue, but
I sewed it together to save time.
Once you have your ribbon ready add velcro stickies to both ends. (Hand stitch for extra security).
And there you have it, a new hat! sort of!


Imagine the possibilities, you can switch up the ribbons to match your outfits.
Try using floral, lace, or pastel colors.
 Hope you enjoyed this tutorial and let me know what you think!

Sunday, April 21, 2013

DIY flower pens


Brighten up your office space in minutes with this simple diy.
I borrowed this idea from offices I've worked in the past, 
though most of them used flowers I never really cared for.
They are usually in flower pots, which is also really cute!

I thought it was still a great idea nonetheless.
 So here's my chic spin on it.
I used freebie pens I've accumulated from church, conferences, hotels.

Materials:
vase 
($1.54 Joann Fabrics)
spray paint
pens
floral tape
artificial flowers

Maybe you already have a vase in the color you like.
I saw a vase in this same exact color (my fav) close to $15. 
I decided to make my own since I already had 
 the spray paint in this color.
Measure how far you want your flowers to stand out from the vase.
Cut the stems for just the top
half of the pen. 
(It's more comfortable to grip the pens if you don't have it
 extended all the way to the bottom)
Wrap two layers of floral tape around the pen and stem.
Continue steps for all the pens.
And there you have it, simple office chic!

I love the contrasting colors here.
I'm excited to bring these to work.
Have you seen something similar to this before?

Wednesday, April 3, 2013

DIY Lace headband


Turn leftover fabric into a fashionable head piece. 
You can use any type of fabric design, (polka dots, floral) 
I used leftover lace from an old shirt.
Next time you decide to throw out a shirt, ask yourself this,
"Can I use this for a crafting project?"
Yes I am encouraging fabric hoarding haha!

Materials needed:
fabric 
(recommended, 2 inches in width) 
hair tie

Measure the length of fabric around your head with the hair tie expanded. 
Guess-timate about how tight or loose you want it.
Fold over ends to hair tie and sew or hand stich.
Finally, add some decorative sequins or leave as is.
And that's it! 
Hope you enjoyed this fun and easy tutorial.


Thursday, February 21, 2013

DIY vintage frame earring holder


 I was checking out frames for my wall gallery and came across this pretty frame.
And then I thought it would be perfect for an earring holder,
 thanks to seeing the many versions on Pinterest. 
No doubt, it will be a nice addition to my wall gallery.
This is a 5x7 frame from Ikea and it's made of plastic instead of wood.  
It was under $3 or $4 bucks, so no complaints here.

Supplies:
Frame
Pearl strands
Paint & stencil (optional)

Measure 1 or 2 strands to fit the width of your frame (whatever you prefer).
Paint polka-dots, hearts, whatever you like or just leave as is. I think either way, is cute.
 If you do decide to paint it, nail polish would work great because it dries a lot faster.
Leave about an inch of string on the ends of the pearls.
After removing the backing, tie a knot (see step 5) around what looks to me like plastic hinges.
 (Step 6) Repeat steps for buttom row.
If it were wood, you could staple it but maybe glue would work also.

And there you have it. 
A cute way to display your favorite earrings with a vintage flair.
Hope you enjoyed and feel free to share!

Tuesday, January 8, 2013

Diy rose bud studs


I got these lovely studs from ebay & thought it would be great gift ideas.
So some pretty ears will be receiving these soon. 
You can find the stud post at your local craft store. 
Just glue with crazy glue & that's it!

Wednesday, December 12, 2012

DIY Vintage peterpan collar necklace


Supplies: Ribbon, felt, lace, button.

1. Cut out 2 shapes of collar.
2. Overlay lace and sew.
3. Connect and sew front of collar.
4. Add button
5. Attach ribbons to both ends of collar and tie a bow!


My beautiful friend Mirna modeling this so effortlessly.
This piece, along with 3 other ones are actually up for bid on Ebay
going towards an awesome fundraising cause. 
Yes way!
If you are interested, here is the link.


Wednesday, November 28, 2012

Diy: chunky blush double layer necklace


Supplies needed:
thread
needle
2 strands of bead
2 gold chains
1. Thread one strand of bead using 14 beads for bottom layer.
Thread 2nd strand using 11 beads for top layer.
2. Secure ends with crimps. 
 (Option 2: If you don't have crimps, you can tie several knots to chain. 
Then add glue to seal knot securely. You can use ribbons instead of chains as well).
3. Lastly, connect double layer beads to chain with jump rings.

Is this cute or is this cute?? 
If you enjoy this, be sure to subscribe by email or google friend connect, for instant updates.


Wednesday, November 21, 2012

Sneak peek

New diy underway.

Tuesday, September 4, 2012

Upcyle necklace


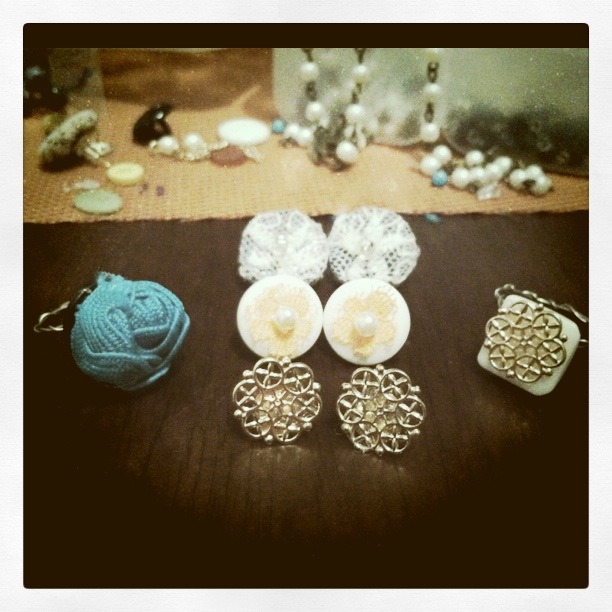
When I saw this layered necklace from forever21 (for $6 bucks!), I instantly imagined how many stud earrings I could create from it. Studs are so chic and understated. The gold rounded designs remind me of monograms, so pretty. It came in two sizes, my friend made a cocktail ring out of the larger size. It looks great on her! Now you don't have to go out and buy something new, I've done this with a a lot of my old jewelry. All you have to do is look through your jewelry box and find some old stuff and turn them into something new!

DIY Lace studs

What you will need: buttons, earring post and a glue gun.
(Glue gun actually isn't the best for making stud earrings.
 I'm still searching for the right kind of glue that will hold well.
 If you know of a good brand, please do tell).
Step 1: I cut off lace from a shirt that I no longer wanted.
 You can also use different styles of fabric you find like polka dots or floral!
Step 2: Use a nail file to sand the buttons a little so it gets abrasive
 and helps hold the lace without being too slippery.
Step 3: Glue the lace to buttons first, then follow with the earring post.
 Add a bead for more interest or just leave as is.